

This tutorial will show you how to create a simple Netduino plus web server. The Netduino plus will respond with "Hello World" when we make a HTTP request over it's Ethernet port. This is a step by step how to with all of the code for the project available for download at the end of this post.
- Let's start by creating a new project. Name it "WebserverHelloWorld"

- Right click on project name and choose to "Add" > "Add new item"

- Add new "Class" and name is "WebServer.cs"

- Here is a very simple version of a web server. It will listen for requests and respond with "Hello World". It will also blink the on-board LED when a web request comes into the Netduino plus.
public class WebServer : IDisposable
    {
        private Socket socket = null;
        //open connection to onbaord led so we can blink it with every request
        private OutputPort led = new OutputPort(Pins.ONBOARD_LED, false);
        public WebServer()
        {
            //Initialize Socket class
            socket = new Socket(AddressFamily.InterNetwork, SocketType.Stream, ProtocolType.Tcp);
            //Request and bind to an IP from DHCP server
            socket.Bind(new IPEndPoint(IPAddress.Any, 80));
            //Debug print our IP address
            Debug.Print(Microsoft.SPOT.Net.NetworkInformation.NetworkInterface.GetAllNetworkInterfaces()[0].IPAddress);
            //Start listen for web requests
            socket.Listen(10);
            ListenForRequest();
        }

        public void ListenForRequest()
        {
            while (true)
            {
                using (Socket clientSocket = socket.Accept())
                {
                    //Get clients IP
                    IPEndPoint clientIP = clientSocket.RemoteEndPoint as IPEndPoint;
                    EndPoint clientEndPoint = clientSocket.RemoteEndPoint;
                    //int byteCount = cSocket.Available;
                    int bytesReceived = clientSocket.Available;
                    if (bytesReceived > 0)
                    {
                        //Get request
                        byte[] buffer = new byte[bytesReceived];
                        int byteCount = clientSocket.Receive(buffer, bytesReceived, SocketFlags.None);
                        string request = new string(Encoding.UTF8.GetChars(buffer));
                        Debug.Print(request);
                        //Compose a response
                        string response = "Hello World";
                        string header = "HTTP/1.0 200 OK\r\nContent-Type: text; charset=utf-8\r\nContent-Length: " + response.Length.ToString() + "\r\nConnection: close\r\n\r\n";
                        clientSocket.Send(Encoding.UTF8.GetBytes(header), header.Length, SocketFlags.None);
                        clientSocket.Send(Encoding.UTF8.GetBytes(response), response.Length, SocketFlags.None);
                        //Blink the onboard LED
                        led.Write(true);
                        Thread.Sleep(150);
                        led.Write(false);
                    }
                }
            }
        }
        #region IDisposable Members
        ~WebServer()
        {
            Dispose();
        }
        public void Dispose()
        {
            if (socket != null)
                socket.Close();
        }
        #endregion
    }
- Now add the following code to Program.cs.
public static void Main()
        {
            Microsoft.SPOT.Net.NetworkInformation.NetworkInterface.GetAllNetworkInterfaces()[0].EnableDhcp();
            WebServer webServer = new WebServer();
            webServer.ListenForRequest();
        }
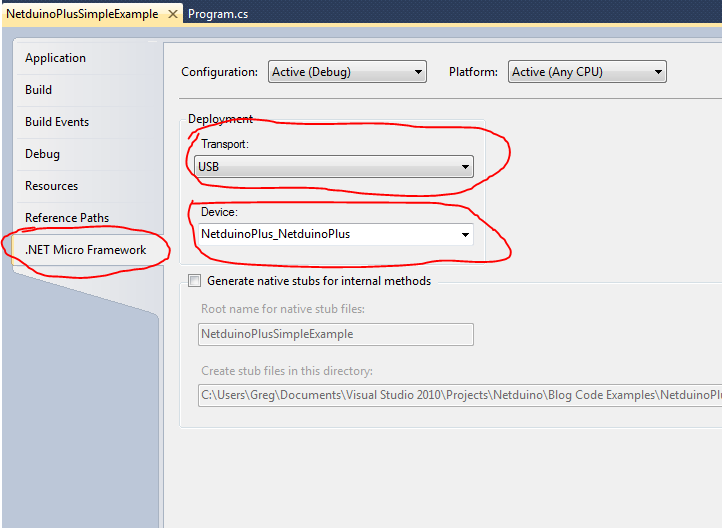
- Make your program run on the Netduino and not the emulator by right clicking on your project > "Properties"
- Select the ".Net Micro Framework" tab and change the following settings.
- Transport: USB
- Device: NetduinoPlus_NetduinoPlus
- Now run the program by pressing F5 or "Debug" > "Start Debugging".
- In the "Output" the program will write the Netduino plus IP address. If you don't have the "Output" window open, select "View" > "Output" to open it.
- Now open a web browser and type the Netduino plus IP in the address bar.
- You should receive back "Hello World" from the Netduino plus.
Here is a video demo of the web server running on the Netduino plus.
Here is the complete source code.
Here is the complete source code.
Thanks Greg for posting this web server.
ReplyDeleteJust received my Netduino-Plus today and got this web server up and running.
Cheers
Gordon
Greg - thanks for sharing your Netduino webserver tutorial. It helped a lot!
ReplyDeleteFor the less experienced at network configuration, like myself, I would add a couple things I ran into getting this working for me. The netduino's IP should be on the same subnet as the network device it is plugged into, i.e., router. I changed my Netduino's IP using MFDeploy.exe located in the Tool folder under Microsoft .NET Micro Framework\4.1. My Netduino initially reported an IP of 192.168.5.100. I couldn't access it using that IP through a browser. Then I realized my router was set to 192.168.3.1, so I changed the Neduino to 192.168.3.10 using MFDeploy and everything worked great.
The other point is that this webserver can be tested on a typical home network by plugging the Netduino into an open port on a Wi-Fi Router using a standard (not crossover) ethernet cable.
These are points no doubt a network guru would take for granted but thought I would mention them in case someone other than me is fumbling around in the dark...
Hello, good evening, my name is jaime Villamarin of Cali, Colombia, I need a help with netduino, I require that from a web page by pressing a button can send the signal to netduino to move a servo motor, and after 3 seconds, this again move to the other side. with the example of web server, how could it?. many thanks
ReplyDeleteHi I have tried all this but still cannot get it to work.
ReplyDeleteI first though it was a problem with the IP address so I fixed that. I was able to ping the netduino. But when it came to entering the address in the web browser all I got was a error saying that the page was not found. It Also seems that the Netduino does not appear in my attached devices list on my router.
Couple things to check. (1) Make sure your Netduino is not on another subnet. (2) Run my demo code and set a break point to see if the request is hitting the Netduino.
ReplyDeleteGreg its a nice work. I like your project.
ReplyDeleteI have a question that you access netduino through LAN ip or internet??
I wanted to know how we can access Netduino plus over internet without attaching it to PC.
can u help me out???
thx in advvance.
if you connect it to a router, and set up port forwarding inside the router for the Netduino, you should be able to surf to it using the routers IP address + port number ex: 70.36.128.231:8000. This will require that the code to changed to work on port 8000 instead of port 80 for example.
DeleteThis did not seem to work for the Safari browsers on the iPad or iPhone... it doesn't complain, but there is simply nothing displayed... it works with firefox or chrome on the PC however...
ReplyDeletewhat might be happening here?
Thank you for your article. It works on Firefox, Chrome and IE.
ReplyDeletethank you
ReplyDeleteI running the webserver code and im get a error on the windows output:
ReplyDeleteThe thread '' (0x2) has exited with code 0 (0x0).
192.168.5.100
The netduino respond to the ping.
can someone help me
thanks
jeannot-92
The problem people are having here is that the code doesn't quite work as posted.
ReplyDeleteYou'll notice that the first thing you do is accept the connection and then immediately check the number of bytes > 0. If you are not running debug or there isn't much else going on on your neduino then the number of bytes is 0 because nothing has yet been received. This will cause it to not respond to some browser or the browser complains that the web page is blank / null response.
To bodge it to work you can add a 1000ms delay after the accept and then it works then that's your problem. Even if you do that you do not know how long the request should take so this won't work reliably. Instead it needs to be written to recognise the end of the request, but it doesn't appear that you can do that with the framework as it is.
Good catch. This thread is old, but I just found it. If I find a way to modify the sample in a simple way I'll post back.
DeleteJim / James - did you ever find a solution to this problem? Is there a way to modify the code so it waits for the inbound data to arrive before continuing?
Deleteis that a no? :)
DeleteWhy do we call ListenForRequest() twice ?
ReplyDeleteHi Greg,
ReplyDeleteI'm new with NetDuino and received mine yesterday. I've tried your example and you blog was very helpful. Within 1/2 hr. the example worked.
Thanks for the blog.
Cheers
John
Hi Greg!
ReplyDeleteI tried this sample and it works fine when debugging from VS, but when I try it without there is no response. How can I solve this?
Best regards:
Daniel
Hi,
ReplyDeleteI'm having some issues pasting the WebServer class code into the class. I've tried pasting it inside 'class WebServer{}', but it woun't work... Where exactly do I paste it? This is the "default code" in the new class:
using System;
using Microsoft.SPOT;
namespace NetduinoApplication1
{
class WebServer
{
}
}
Anyone have an example in asp.net to send the data from that application to netduinoplus
ReplyDeleteThis comment has been removed by the author.
DeleteJust use a normal HTTP Get Request with ASP and pass in parameters in the URL, like netduino/action?id=1?custom=some_stuff
DeleteThanks for this really simple code. I am going to expand on it to work with post backs, and jQuery AJAX and JSON, trying to keep it as lightweight as possible.
ReplyDeleteBecause too many quality blog entries on development are lost in the vastness of the web, CodeProject is bringing together the best to give them the exposure they deserve. CodeProject has over 10 million members browsing over 40,000 articles, each article having hundreds of views.
ReplyDeleteIn particular, we've been trying to get more attention to Internet of Things posts. I've been looking at your blog and there are some phenomenal entries (like this one) that we'd love to have on CodeProject.
I'd be happy to give you the details (you can also see our FAQ herehttp://www.codeproject.com/Articles/66029/Code-Project-Technical-Blog-FAQ), or answer any questions you might have, if you were interested in getting more eyes on your content.
Are you in need of a reliable garage door service that is affordable as well? Rafael Garage Door is your Local Garage Door maintenance provider and we are one-stop-shop for all Garage Door Repair Northwest Tampa services.
ReplyDelete