Supplies
- Garage door opener

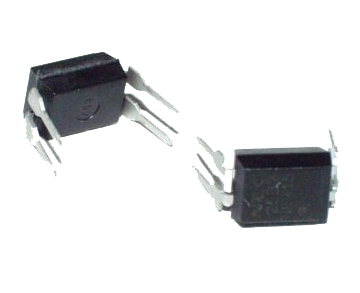
- Optoisolator with Darlington Driver - 1 Channel. I purchased mine from Sparkfun.

- 100 ohm resistor

- 33 ohm resistor

- Netduino plus


Here is the schematic for interfacing with the garage door opener. Excuse my unsophisticated schematic as I don't own any electrical CAD software.

- Connect the Optoisolator pin 1 (Anode) to the Netduino plus digital pin 13
- Connect the Optoisolator pin 2 (Cathode) to a ground pin on the Netduino plus with a 33 ohm resistor in-line.
- Connect the Optoisolator pin 3 (Emitter) to one side of the garage door opener push-button with a 100 ohm resistor in-line.
- Connect the Optoisolator pin 4 (Collector) to the other side of the garge door opener push-button.
Here is mine all built. You may notice mine has is wired for two garages although I only have one hooked up to the Netduino for this tutorial.

2. Code it
For the code, I am going to start with a stubbed out web server code from my previous blog post. To get more information on the basic code for a web server see my previous blog post.
After you download the code, open the project. Let's modify the code so we can send an HTTP request to the Netduino to activate the garage door opener. We are going to send a command to push the button on the garage door opener. We don't know if we are opening it or closing it since we are not yet monitoring the garage door status. We will combine this project to activate the garage door with the monitor code in a later post. Then we will be able to send the specific command "Open" or "Close".
Make the following changes to code
- How to write a basic web server with Netduino: Netduino Plus Web Server Hello World.
After you download the code, open the project. Let's modify the code so we can send an HTTP request to the Netduino to activate the garage door opener. We are going to send a command to push the button on the garage door opener. We don't know if we are opening it or closing it since we are not yet monitoring the garage door status. We will combine this project to activate the garage door with the monitor code in a later post. Then we will be able to send the specific command "Open" or "Close".
Make the following changes to code
- Line 6: Initialize digital port 13 to talk to the garage door opener
- Lines 38-48: Parse the http request and confirm the user requested to door be activated with the command "HTTP:/192.XXX.X.XXX/activatedoor"
- Line 49: Call our method to activate the garage door opener.
- Lines 51-55: Send HTTP response.
- Lines 56-62: send a HTTP response - command not recognized.
- Lines 68-75: activate garage door method
- Line 70: light the on-board LED for visual confirmation command is being sent to garage door opener
- Line 71: Send voltage to the digital pin 13 to close the push-button on the garage door opener
- Line 72: Wait for 1 second
- Line 73: Turn off on-board LED
- Line 74: Stop voltage to pin 13
public class WebServer : IDisposable
    {
        private Socket socket = null;
        //open connection to onbaord led so we can blink it with every request
        private OutputPort led = new OutputPort(Pins.ONBOARD_LED, false);
        private OutputPort Garage2CarOpener = new OutputPort(Pins.GPIO_PIN_D13, false);

        public WebServer()
        {
            //Initialize Socket class
            socket = new Socket(AddressFamily.InterNetwork, SocketType.Stream, ProtocolType.Tcp);
            //Request and bind to an IP from DHCP server
            socket.Bind(new IPEndPoint(IPAddress.Any, 80));
            //Debug print our IP address
            Debug.Print(Microsoft.SPOT.Net.NetworkInformation.NetworkInterface.GetAllNetworkInterfaces()[0].IPAddress);
            //Start listen for web requests
            socket.Listen(10);
            ListenForRequest();
        }

        public void ListenForRequest()
        {
            while (true)
            {
                using (Socket clientSocket = socket.Accept())
                {
                    //Get clients IP
                    IPEndPoint clientIP = clientSocket.RemoteEndPoint as IPEndPoint;
                    EndPoint clientEndPoint = clientSocket.RemoteEndPoint;
                    //int byteCount = cSocket.Available;
                    int bytesReceived = clientSocket.Available;
                    if (bytesReceived > 0)
                    {
                        //Get request
                        byte[] buffer = new byte[bytesReceived];
                        int byteCount = clientSocket.Receive(buffer, bytesReceived, SocketFlags.None);
                        string request = new string(Encoding.UTF8.GetChars(buffer));
                        string firstLine = request.Substring(0, request.IndexOf('\n')); //Example "GET /activatedoor HTTP/1.1"
                        string[] words = firstLine.Split(' ');  //Split line into words
                        string command = string.Empty;
                        if( words.Length > 2)
                        {
                            string method = words[0]; //First word should be GET
                            command = words[1].TrimStart('/'); //Second word is our command - remove the forward slash
                        }
                        switch (command.ToLower())
                        {
                            case "activatedoor":
                                ActivateGarageDoor();
                                //Compose a response
                                string response = "I just opened or closed the garage!";
                                string header = "HTTP/1.0 200 OK\r\nContent-Type: text; charset=utf-8\r\nContent-Length: " + response.Length.ToString() + "\r\nConnection: close\r\n\r\n";
                                clientSocket.Send(Encoding.UTF8.GetBytes(header), header.Length, SocketFlags.None);
                                clientSocket.Send(Encoding.UTF8.GetBytes(response), response.Length, SocketFlags.None);
                                break;
                            default:
                                //Did not recognize command
                                response = "Bad command";
                                header = "HTTP/1.0 200 OK\r\nContent-Type: text; charset=utf-8\r\nContent-Length: " + response.Length.ToString() + "\r\nConnection: close\r\n\r\n";
                                clientSocket.Send(Encoding.UTF8.GetBytes(header), header.Length, SocketFlags.None);
                                clientSocket.Send(Encoding.UTF8.GetBytes(response), response.Length, SocketFlags.None);
                                break;
                        }
                    }
                }
            }
        }
        private void ActivateGarageDoor()
        {
            led.Write(true);                //Light on-board LED for visual cue
            Garage2CarOpener.Write(true);   //"Push" garage door button
            Thread.Sleep(1000);             //For 1 second
            led.Write(false);               //Turn off on-board LED
            Garage2CarOpener.Write(false);  //Turn off garage door button
        }
        #region IDisposable Members
        ~WebServer()
        {
            Dispose();
        }
        public void Dispose()
        {
            if (socket != null)
                socket.Close();
        }
        #endregion
    }
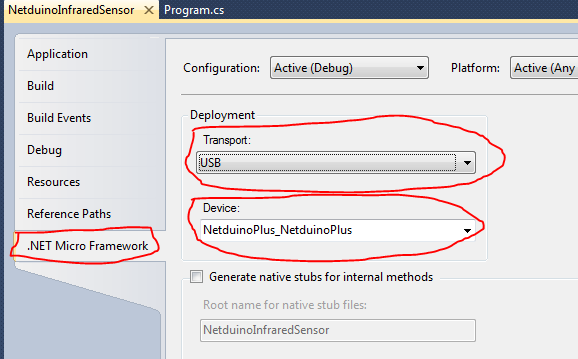
Remember to make sure you are deploying to your Netduino board and not the emulator. You do that by right-clicking on the Netduino project in Visual Studio > properties > .Net Framework. Set "Transport" to USB and confirm "Device" is set to "Netduino Plus".
3. Run it
- Now run the code in debug mode.
- Open another a web browser and enter the IP address that the Netdiuno board displayed in the output window. For me its "http://192.168.0.153/activatedoor"
- You should see the LED on the Netduino plus light and the door should open or close.

To learn how to write the Android app that will control and monitor the garage door read the step by step blog post here. http://androidcodemonkey.blogspot.com/2011/10/android-garage-door-app.html